


'%3e%3cpath%20d='M17.5%208.75C17.5%2013.58%2013.58%2017.5%208.75%2017.5C3.92%2017.5%200%2013.58%200%208.75C0%203.92%203.92%200%208.75%200C13.58%200%2017.5%203.92%2017.5%208.75Z'%20fill='%23F56708'/%3e%3cpath%20d='M13.2123%2010.85H12.7048C11.9698%2012.915%2011.5498%2013.125%2010.4473%2013.125H8.22482C7.62982%2013.125%207.27982%2012.8275%207.27982%2012.215V9.065C10.1498%209.065%2010.0098%208.9425%2010.3248%2010.535H10.9023C10.8848%209.9925%2010.8673%209.205%2010.8673%208.6975C10.8673%208.2075%2010.8848%207.4375%2010.9373%206.79H10.3598C10.0448%208.4875%2010.2023%208.33%207.29732%208.3475V4.6025C7.29732%204.4275%207.34982%204.375%207.52482%204.375H10.6573C11.3573%204.375%2011.6898%204.83%2012.0398%206.475H12.5823L12.7573%203.5C11.3748%203.64%2010.4123%203.64%208.73232%203.64C7.03482%203.64%205.59982%203.6225%204.00732%203.5525V4.235C5.26732%204.375%205.40732%204.55%205.42482%205.11C5.45982%205.88%205.47732%207.42%205.47732%208.715C5.47732%2010.0275%205.47732%2011.585%205.44232%2012.3725C5.40732%2012.9325%205.28482%2013.1075%204.02482%2013.2475V13.93C4.75982%2013.8775%206.64982%2013.86%208.36482%2013.86C8.97732%2013.86%2010.1498%2013.825%2012.8623%2013.93L13.2123%2010.85Z'%20fill='white'/%3e%3c/g%3e%3cdefs%3e%3cclipPath%20id='clip0_2416_2431'%3e%3crect%20width='17.5'%20height='17.5'%20fill='white'/%3e%3c/clipPath%3e%3c/defs%3e%3c/svg%3e)
%20scale(1.1)'%20fill='%23FFFFFF'%3e%3cpath%20d='M22.655%208.719c-1.802-1.801-4.726-1.801-6.564%200l-7.351%207.35c-.45.45-.45%201.2%200%201.65.45.449%201.2.449%201.65%200l7.351-7.351c.899-.899%202.362-.899%203.264%200%20.9.9.9%202.364%200%203.264l-7.239%207.239c.9.899%202.362.899%203.263%200l5.589-5.589c1.836-1.838%201.836-4.763.037-6.563zm-2.475%202.437c-.451-.45-1.201-.45-1.65%200l-7.354%207.389c-.9.899-2.361.899-3.262%200-.45-.45-1.2-.45-1.65%200s-.45%201.2%200%201.649c1.801%201.801%204.726%201.801%206.564%200l7.351-7.35c.449-.487.449-1.239.001-1.688zm-2.439-7.35c-1.801-1.801-4.726-1.801-6.564%200l-7.351%207.351c-.45.449-.45%201.199%200%201.649s1.2.45%201.65%200l7.395-7.351c.9-.899%202.371-.899%203.27%200%20.451.45%201.201.45%201.65%200%20.421-.487.421-1.199-.029-1.649h-.021zm-2.475%202.437c-.45-.45-1.2-.45-1.65%200l-7.351%207.389c-.899.9-2.363.9-3.265%200-.9-.899-.9-2.363%200-3.264l7.239-7.239c-.9-.9-2.362-.9-3.263%200L1.35%208.719c-1.8%201.8-1.8%204.725%200%206.563%201.801%201.801%204.725%201.801%206.564%200l7.35-7.351c.451-.488.451-1.238%200-1.688h.002z'/%3e%3c/g%3e%3c/svg%3e)

Blog /
Set Up Pricing Rules
Set Up Pricing Rules
 Louie · June 04, 2026
Set Up Pricing Rules
Charge based on what your customers customize — text elements, image uploads, print area size, and more. Pricing Rules let you build flexible, per-product pricing that reflects the real cost of customization work.
Why Variable Pricing?
Not all customization jobs cost the same to produce. An engraved name takes less time and material than a full-wrap photo print. Pricing Rules let you break down your pricing by the specific customization choices your customer makes, so your prices automatically adjust based on complexity.
You can also set up bulk discounts and global add-on services like gift wrapping or rush fees — all calculated automatically at checkout.
How It Works: Two Layers of Pricing
Customthings pricing has two layers that work together:
Layer | What it covers | Where to configure |
|---|---|---|
Product-level Pricing Rules | Fees based on customization elements, area, uploads etc.. Assigned per product | Pricing Rules (left sidebar) → assign to individual products 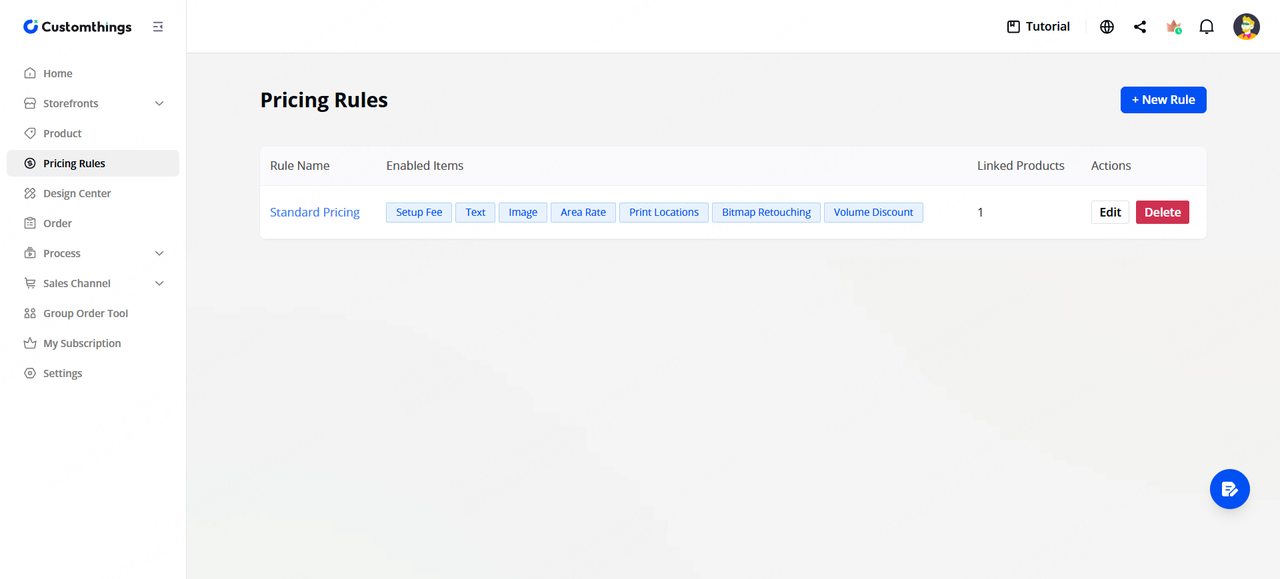 |
Store-wide Checkout Add-ons Services | Flat-fee extras shown at checkout for all products (rush fee, gift packaging, etc.) | Settings → Order and Promos 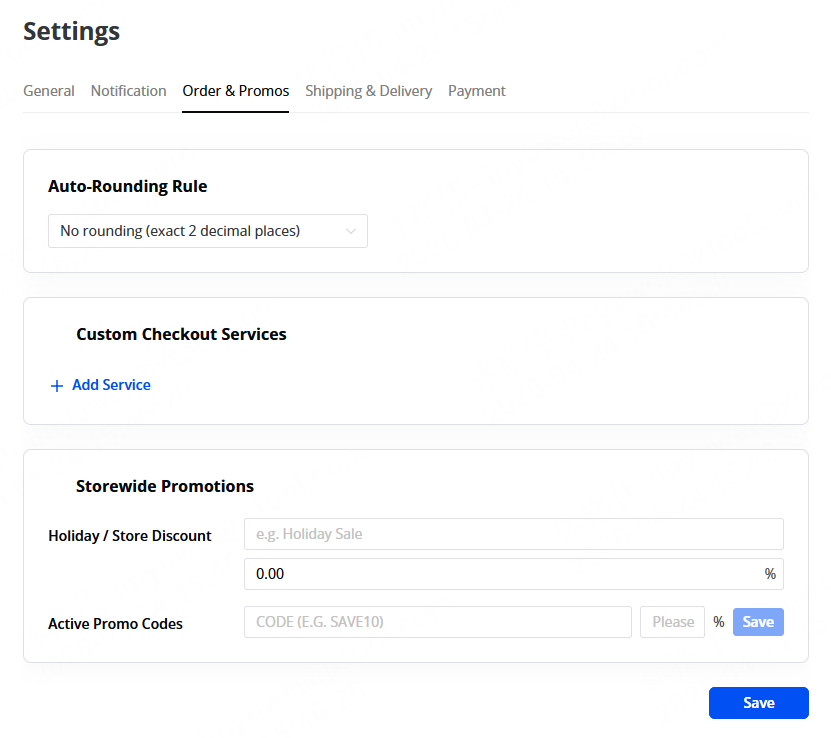 |
Setting Up a Pricing Rule
Go to Pricing Rules in the left sidebar and create a new rule. A pricing rule can include any combination of the following:
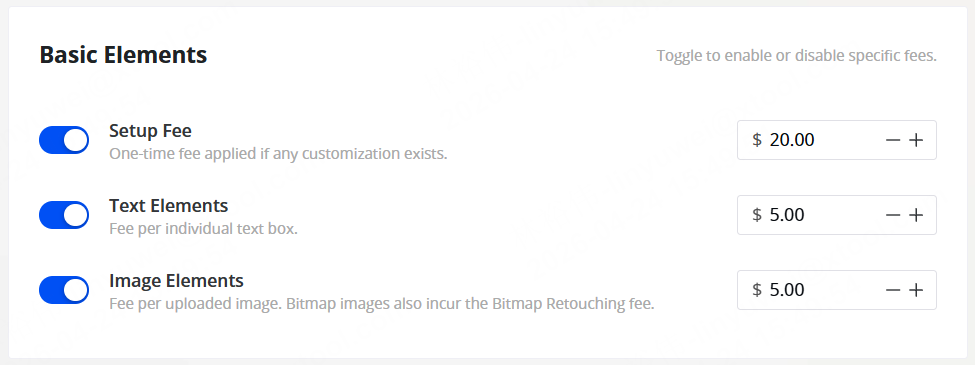
Setup Fee
A one-time flat fee charged whenever a customer orders a customized product. Think of it as a base customization service charge.
💡Example: $20 setup fee for any personalized item.
Text Elements
A per-element fee charged each time the customer adds a text element to their design.
💡Example: $5 per text element.
Image Elements
A per-element fee charged each time the customer adds a vector image (from your provided image library) to their design.
💡Example: $5 per image element.
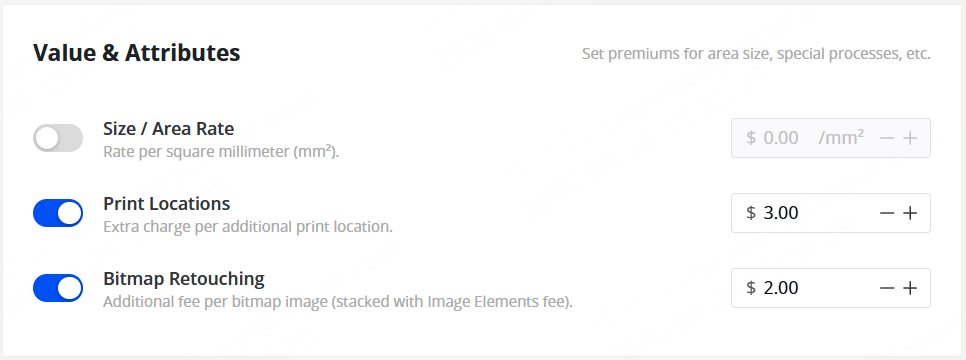
Value & Attributes
Fees based on the physical characteristics of the customization:
- Size / Area Rate — charge based on how large the design area is.
- Print Locations — charge per additional print location. (e.g., front + back of a shirt = 2 zones)
- Bitmap Retouching — charge per image the customer uploads from their own files.
💡Example: 3 per additional print location, 2 per additional bitmap image.
Volume Discount Tiers
Volume discounts for bulk purchases. Set quantity thresholds with corresponding discount percentages.
💡Example: Buy 2+ items, get 10% off. Buy 5+, get 20% off ("2" here is set as the threshold of the 10% discount and "5" is the threshold of the 20% discount, meaning if a customer buys 2, 3 or 4 items, 10% is consistently valid. When he or she buys 5 or more here, the 20% discount takes effect).

Assigning a Pricing Rule to a Product
Once you've created a rule, go to Product, edit a product, and select the pricing rule from the dropdown in the product settings. Each product can have one pricing rule assigned.
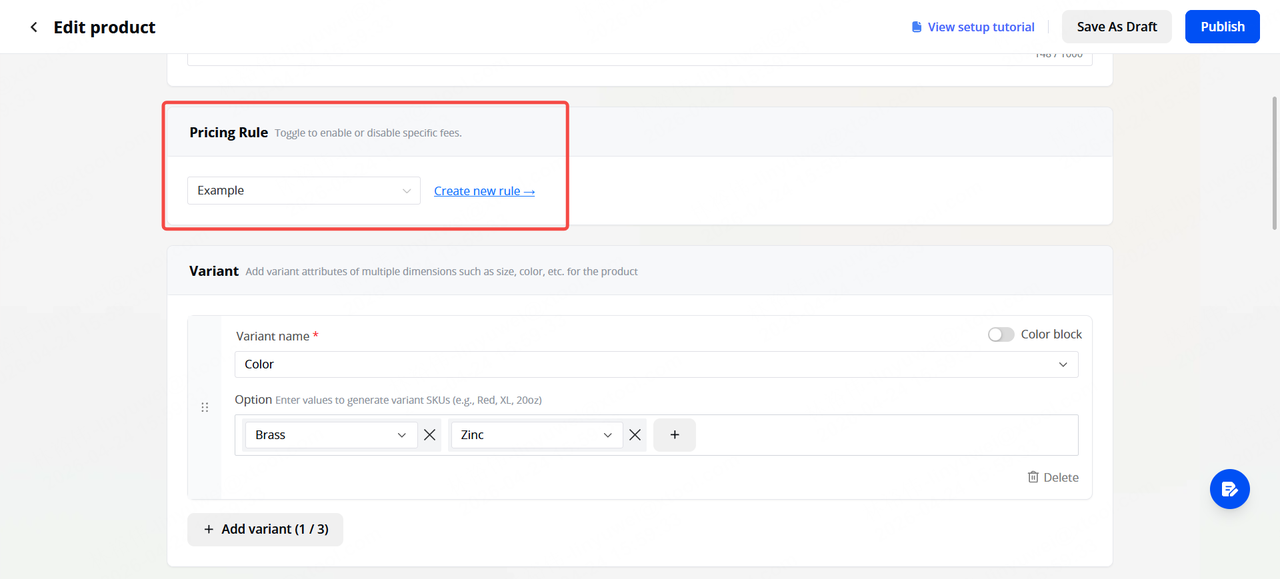
When a customer customizes that product, the checkout will automatically itemize all applicable fees — setup fee, element charges, area rates — so the customer sees a transparent price breakdown before paying.
Setting Up Global Add-on Services
Go to Settings → Order and Promos. Here you can configure store-wide extras that appear at checkout for every product:
- Auto-Rounding Rule — automatically round prices for a cleaner display
- Custom Checkout Services — create optional extras that customers can select during checkout
- Common custom checkout services include:
- Rush/express processing fee
- Gift box packaging
- Premium wrapping

These show up as checkboxes on the checkout page. Customers opt in if they want them, and the cost is added to their total.
What the Customer Sees at Checkout
Here's an example of how pricing breaks down at checkout for a customized product:
- Setup fee: €20.00
- Text element (×1): €5.00
- Image element (×1): €5.00
- Location fee: €3.00
- Subtotal: €33.00 x2
- Bulk discount (2+ items, 10% off): −€6.60
- Gift packaging (add-on): €5.00
- Total: €64.40
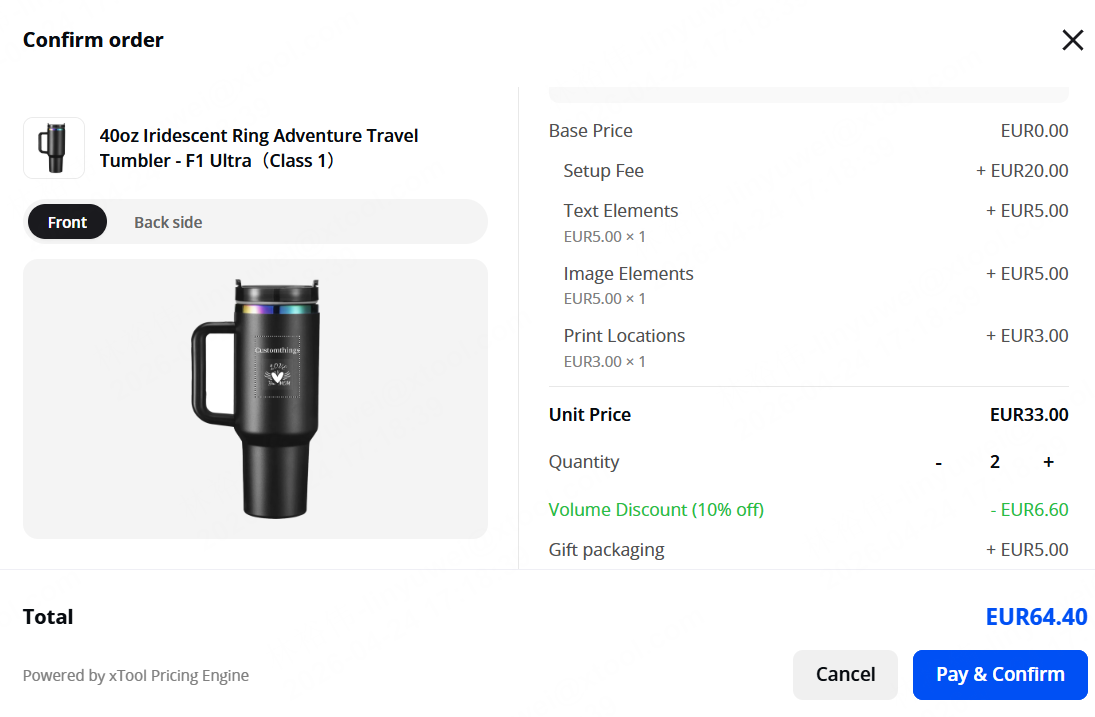
Every fee is itemized so the customer understands exactly what they're paying for.
Tips
- Start simple. If you're new to variable pricing, begin with just a setup fee and one element type. You can always add complexity later.
- Use discount tiers to encourage larger orders. Even a small bulk discount (5–10%) can significantly increase average order value at events.
- Store-wide Checkout Add-ons services are great for upselling at craft shows. "Add gift wrapping for $5" is an easy yes for customers buying gifts.
- Review your pricing rule from the customer side. After setting up, place a test order through your store to make sure the price breakdown looks right and the total makes sense.
→ Suggested item: Set up your Pricing Rules now→ Next: Set Up Payments & Checkout: connect Stripe and configure shipping before you start accepting paid orders.